First You Know What is Main Contents in Post Coding
- the_post()
- the_excerpt() Source
Replace Code “the_post()” by the_excerpt() in “……..” in Them File Editor.
www.shrimuktsarsahib.com
www.shrimuktsarsahib.com
Replace Code “the_post()” by the_excerpt() in “……..” in Them File Editor.

(100% Solved)
I accidentally put it on DVI mode in the monitor settings. So I pressed some buttons on it to reset it. But the monitor is now only blinking colors like red, white, black and gold. how to exit blinking, i pressed the button many times but not working, Motherboard L9372-1N/48.7E203.01 Interface bd l9137-1m
Two functions have been given by the company to source the monitor, first automatic and second manual. And there are two source options available in Moniot one is VGA and the other is DVI. If you connect cable to any source by keeping it in auto mode, then automatically you will not have any problem in connecting any cable. But when you put the monitor in manual mode and select the DVI source and connect the VGA cable to the port instead of DVI, you will automatically get the problem of colorblinking (burning mode).
First you need DVI (input to moniter) cable
In my case i bought this HDMI (Female) TO DVI (Male) wire from Amazon.

In your case according to your cpu output port or other output source you can buy vga to dvi, hdmi (male) to dvi (male), dp to dvi, …. other convertion cable other port to dvi. use this cable from VGA To DVI .
Your Problem will be solv 10000%…. if yur probles was solved then comment here for congrtulations
Thank reading This Post. Hope Your Monitor Burning Mode Problem Solved
Suggest to Monitor Companies Please make hard Reset Button On Backside of LCD Pannel, will everything can rest
Thanks…
Use This Code To Type and Print or echo input value In PHP
<form action="" method="post">
<input type="text" name="nm">
<input type="submit" name="sub">
</form>
<?php
if (isset($_POST['sub']))
{
echo $_POST['nm'];
}
?>Meta Charsets in Simple Languages
Charsets are converter for unicode to binary to read computer our languages
“ISO-8859-8”
This charset working only for 256 (HTML4) character conversation unicode to binary
“UTF-8”
This Charset Supported in HTML5 more Than 10000 character support in worldwide languages to to convert unicode to banry language
endif is a tag and starting from “:” and closing tag is “endif;”
(Note:- Here “” not Included in code”)
endif tag same work as “{” and “}”
Example
<?php
$a=20;
$b=10;
if ($a > $b) {
echo "a is greater<br>";
}
?>
<?php
$a=20;
$b=10;
if ($a > $b) :
echo "a is greater<br>";
endif;
?>Both Code Are Same Work
When i use in “if contions” for Multiple {}
Then we use “: endif;” tag for one of whole code, we can type “{}” tags inside “endif” tag
Problem
Dowload OBS Studio 23.1.0

Sharing folders between PCs without a wired connection can be convenient for quick file transfers. Here’s a step-by-step guide to setting up wireless file sharing between two PCs.
gpedit.msc, and press Enter to open the Group Policy Editor.Restart both PCs and try accessing the shared folder again. If you still see a password prompt, ensure all settings are applied as described.
If your computer is on a large network, such as in a department or organization where multiple computers are connected to the same network, do not set folder permissions to “Everyone.” This could expose your files to anyone on the network.
However, if you’re on a Home, Small office, or a network where only trusted individuals have access, it’s generally safe to set permissions to “Everyone” for easier sharing.
Always ensure that you are aware of who has access to the network to keep your data secure.
Sometimes you may see this error when trying to access a shared folder:
\\PC-NAME is not accessible.
Account restrictions are preventing this user from signing in.
For example: blank passwords aren't allowed...
👉 Solution:
After applying this, the error will be resolved and the shared folder will be accessible from other PCs. ✅
If you still get the same error, you may need to adjust a local security policy:
gpedit.msc, and press Enter.This allows folder sharing to work even if the account has no password, but for security reasons using a password is always recommended. 🔒
Here is tutorial only for Adobe Premiere Pro And After Effect Windos 10.
If Not working Then Commenting Please.
1 – Right Click the Windows Logo
2 – Choose Apps and Features
3 – Click “Optional Features”
4 – Press the “+” sign where it says “Add a feature”
5 – Search for “Media Feature Pack”
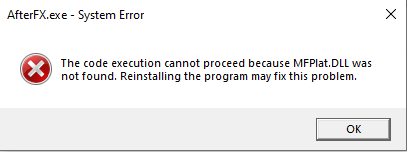
Note : If Not Working Then Update Windows.
